Flutter渲染原理与性能优化

之前的内容我们讲的是Flutter的基本布局控件使用方式,包括单元素布局与多元素布局。为什么会有这两种区分呢?还有一些控件根本没有布局方式,比如RichText,那它是怎么展示的?

这一节我们就来深入看下Flutter的Widget是怎么构建、布局、渲染的,它们之间又靠什么联系在一起。

首先我们从官方示例开始看起。

Flutter示例说明

使用Android Studio创建Flutter工程,会创建一个默认的界面,我们可以从这个界面分析出一点内容。

main.dart 内容如下:

1
2
3
4
5
6
7
8
9
10
11
12
13
14
15
16
17
18
19
20
21
22
23
24
25
26
27
28
29
30
31
32
33
34
35
36
37
38
39
40
41
42
43
44
45
46
47
48
49
50
51
52
53
54
55
56
57
58
59
60
61
62
63
64
65
66
67
68
69
70
71
72
73
74
75
76
77
78
79
80
81
82
83
84
85
86
87
88
89
90
91
92
93
94
95
96
97
98
99
100
101
102
103
104
105
106
107
108
109
110
111
import 'package:flutter/material.dart';

void main() => runApp(MyApp());

class MyApp extends StatelessWidget {
// This widget is the root of your application.
@override
Widget build(BuildContext context) {
return MaterialApp(
title: 'Flutter Demo',
theme: ThemeData(
// This is the theme of your application.
//
// Try running your application with "flutter run". You'll see the
// application has a blue toolbar. Then, without quitting the app, try
// changing the primarySwatch below to Colors.green and then invoke
// "hot reload" (press "r" in the console where you ran "flutter run",
// or simply save your changes to "hot reload" in a Flutter IDE).
// Notice that the counter didn't reset back to zero; the application
// is not restarted.
primarySwatch: Colors.blue,
),
home: MyHomePage(title: 'Flutter Demo Home Page'),
);
}
}

class MyHomePage extends StatefulWidget {
MyHomePage({Key key, this.title}) : super(key: key);

// This widget is the home page of your application. It is stateful, meaning
// that it has a State object (defined below) that contains fields that affect
// how it looks.

// This class is the configuration for the state. It holds the values (in this
// case the title) provided by the parent (in this case the App widget) and
// used by the build method of the State. Fields in a Widget subclass are
// always marked "final".

final String title;

@override
_MyHomePageState createState() => _MyHomePageState();
}

class _MyHomePageState extends State<MyHomePage> {
int _counter = 0;

void _incrementCounter() {
setState(() {
// This call to setState tells the Flutter framework that something has
// changed in this State, which causes it to rerun the build method below
// so that the display can reflect the updated values. If we changed
// _counter without calling setState(), then the build method would not be
// called again, and so nothing would appear to happen.
_counter++;
});
}

@override
Widget build(BuildContext context) {
// This method is rerun every time setState is called, for instance as done
// by the _incrementCounter method above.
//
// The Flutter framework has been optimized to make rerunning build methods
// fast, so that you can just rebuild anything that needs updating rather
// than having to individually change instances of widgets.
return Scaffold(
appBar: AppBar(
// Here we take the value from the MyHomePage object that was created by
// the App.build method, and use it to set our appbar title.
title: Text(widget.title),
),
body: Center(
// Center is a layout widget. It takes a single child and positions it
// in the middle of the parent.
child: Column(
// Column is also layout widget. It takes a list of children and
// arranges them vertically. By default, it sizes itself to fit its
// children horizontally, and tries to be as tall as its parent.
//
// Invoke "debug painting" (press "p" in the console, choose the
// "Toggle Debug Paint" action from the Flutter Inspector in Android
// Studio, or the "Toggle Debug Paint" command in Visual Studio Code)
// to see the wireframe for each widget.
//
// Column has various properties to control how it sizes itself and
// how it positions its children. Here we use mainAxisAlignment to
// center the children vertically; the main axis here is the vertical
// axis because Columns are vertical (the cross axis would be
// horizontal).
mainAxisAlignment: MainAxisAlignment.center,
children: <Widget>[
Text(
'You have pushed the button this many times:',
),
Text(
'$_counter',
style: Theme.of(context).textTheme.display1,
),
],
),
),
floatingActionButton: FloatingActionButton(
onPressed: _incrementCounter,
tooltip: 'Increment',
child: Icon(Icons.add),
), // This trailing comma makes auto-formatting nicer for build methods.
);
}
}

之前写了很多常用widget的使用方法,但是还没有系统地对展示过程进行说明,这里对Demo中的每一行作用,进行详细说明:

  • import 'package:flutter/material.dart';这是dart语言的用法,这里导入的是MaterialDesign风格的包,里面有各种MaterialDesign风格控件以及常用控件。我们常用的MaterialApp、Scaffold、RaisedButton、Card等,都属于MaterialDesign风格的控件。

  • void main() => runApp(MyApp()); 这个是主方法入口,main方法为程序调用方法,runApp方法将一个Widget加到根节点中,添加方式稍后再原理解析中详细说明。MyApp()创建了一个Widget对象,下面的代码是MyApp类的声明。

  • MyApp类声明中,说明了这是一个StatelessWidget的子类。也就是说,这个类应该是无状态的,里面的字段应该是不可变更的,为final类型。如果想要更新这个Widget的展示效果,只能重新创建一个新的对象来实现而不能复用原来对象。

  • MyApp的build方法返回了需要展示的Widget内容,这里返回的Widget和MyApp本身没有关系,只是他们的Element有关系,这一点要弄清楚,我之前也是在这一项卡了很久才理解。如果真的要想象这两个有关系,可以认为是父子关系。在这里返回的Widget是MaterialApp,这是一个典型的MaterialDesign应用,里面指定了theme,而在home中设置的是真正的界面widget.另外MaterialApp中也支持路由设置。

  • MyHomePage类声明中,说明了这是一个StatefulWidget的子类,它与StatelessWidget的区别在于它无需重建类即可变更界面内容,变更方式通过State来实现。

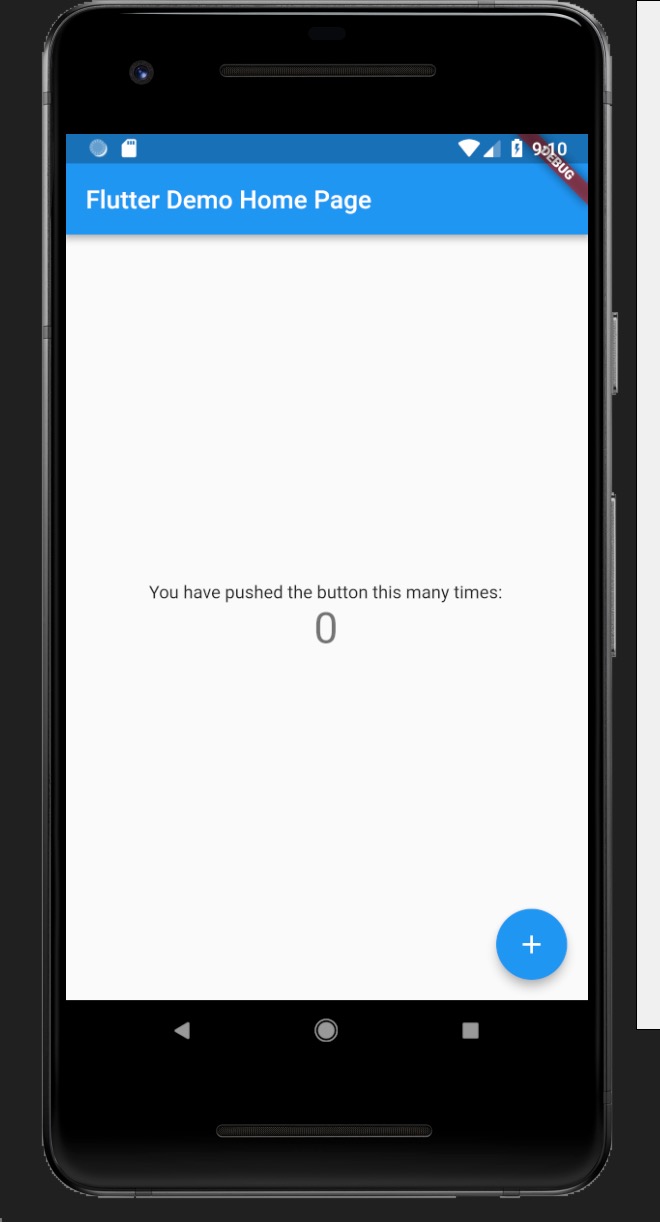
  • _MyHomePageState中存储了MyHomePage的状态信息,在State中进行变更,界面会随之变动。同样通过build方法提供界面展示效果,里面返回的是一个Scaffold类型Widget,这是最常用的MaterialDesign风格设计框架,提供了各种展示效果。在Demo中分别提供了AppBar、界面主体以及一个浮动按钮。在_MyHomePageState中还设置了一个方法,点击按钮时,更新界面展示内容。

下面是一个这个界面的效果:

Widge类型说明

在Demo中使用到了几种Widget?一一列出来:MyApp、MaterialApp、MyHomePage、Scaffold、AppBar、Text、Center、Column、FloatingActionButton、Icon.

这么多组件中,我们自己定义的只有两个:MyApp、MyHomePage,而这两个控件的父类,分别是:StatelessWidget、StatefulWidget,这两种也是Flutter推荐使用的两个父控件类型。

按照官方的设计原则,StatelessWidget、StatefulWidget这两种组合Widget基本上可以满足需要的所有情况,不过这不意味着我们不能自定义其它Widget.

下面列出几种经常遇到的基础Widget:

  • StatelessWidget 组合型Widget,widget实例创建后,不可更改。比如:Container、RaisedButton等,如果有变动,需要重新创建实例。

  • StatefulWidget 组合型Widget,widget实例携带一个state实例,state实例内容可变更。这种Widget一般用于界面绘制的桥梁。但是如果滥用也会产生性能问题,本文后面会根据源码给出性能优化建议。

  • RenderObjectWidget 渲染型Widget,这种一般是基础widget,可以将该widget内容渲染出来。

  • SingleChildRenderObjectWidget 渲染型Widget,这种是RenderObjectWidget的一个子类,特点是该Widget只有一个子控件,比如之前介绍过的Padding、Align等。

  • MultiChildRenderObjectWidget 渲染型Widget,这种同样是RenderObjectWidget的一个子类,特点是该widget可以有超过一个的子控件,比如之前介绍过的Flex等。

  • LeafRenderObjectWidget 渲染型Widget,这种同样是RenderObjectWidget的一个子类,特点是该widget不会有子控件,只是由其本身进行渲染,比如RichText、RawImage等。

  • ProxyWidget 代理型Widget,这种widget用来进行数据在widget之间传递,比如常用的InheritedWidget,一般的状态管理框架也是基于这个原理实现的。

我们的Demo,乃至于各种复杂的界面,主要也是这几种Widget组成的。

界面构建过程

上面说了几种基础Widget类型,如果将Demo中涉及到的Widget整理成一个树(实际上widget不算是一个真正的树,至少不是一个静态树,真正的树是Element和RenderObject),可以看到如下结构:

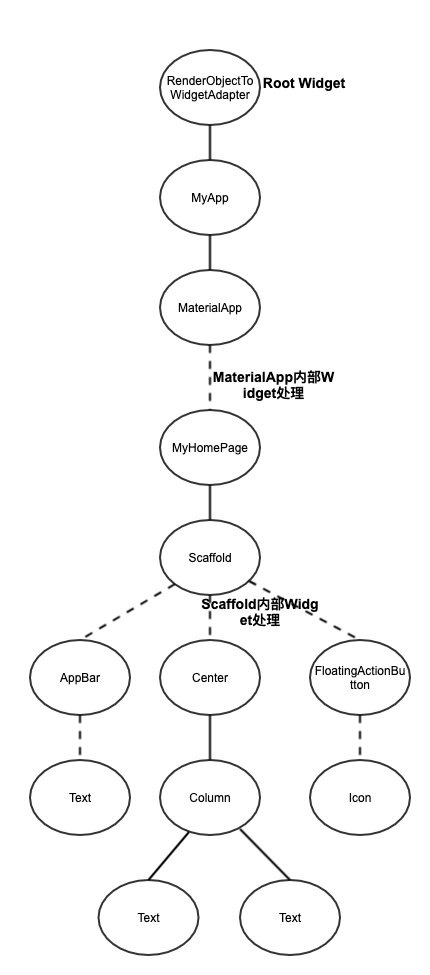
在树形结构中可以看到Widget的互相依赖过程,但是这个Widget树是怎样变成我们可见的界面的?中间经过了哪些转换过程?我们先说一下两个开发时没有涉及到的东西:ElementRenderObject

  • Element 这个是真正的节点,用来关联Widget与渲染对象。每一个Widget都对应着一个Element,但是Widget实例会经常变动,但是渲染树不能经常改变,因此Element会尽可能改变而不是重新创建。

  • RenderObject 是一个渲染节点数,这里面的每一个节点都会在界面上绘制出来。RenderObject与Element或者Widget不是一一对应的,只有RenderObjectWidget以及它的子类才会存在RenderObject

Widget、Element和RenderObject三者关系

上面简单介绍了Element、RenderObject,但是感觉还是不清楚,下面我们通过Flutter源码进行说明:

查看Widget类的代码,里面有这样一项:

1
Element createElement();

这个就是Widget对应的Element,在不同的Widget中,会创建不同的Element,比如StatelessElement、StatefulElement、RenderObjectElement、SingleChildRenderObjectElement、MultiChildRenderObjectElement、LeafRenderObjectElement、ProxyElement等。因为是一一对应,同样在Element中也会持有Widget的对象:

1
2
3
@override
Widget get widget => _widget;
Widget _widget;

而RenderObject则针对的是可渲染Widget,也就是RenderObjectWidget,部分代码如下:

1
RenderObject createRenderObject(BuildContext context);

也就是说会在RenderObjectWidget的子类中创建RenderObject,但是实际上这样做只是为了方便开发人员使用,真正情况还是在Element中持有RenderObject对象,如下面代码所示:

1
2
3
4
5
6
7
8
RenderObject get renderObject => _renderObject;
RenderObject _renderObject;

void mount(Element parent, dynamic newSlot) {
super.mount(parent, newSlot);
_renderObject = widget.createRenderObject(this);
...
}

所以三者的情况就是Widget用于开发人员设计控件,RenderObject用于界面渲染,Element连接两者展示。

Flutter与Android界面开发对比

Android界面开发是命令式的,如果需要变更某一个View,需要获取该View的句柄,然后对view进行参数变更。这样的实现方式有很强的针对性,同时绘制过程中也会自动判断,可以精准的对某一个View进行绘制。但是这种方式有一些缺点,如果变动的view比较多时,就需要为每一项单独设置,而且需要开发人员自己控制的话,较为复杂的界面逻辑需要很强的处理能力。

Flutter界面开发是声明式的,每次只要定义好数据项,同时声明这些数据项与Widget的绑定关系。真正使用时,只需要变更数据内容,然后重建Widget实例就可以了。这种方式的优势就是简单粗暴,并更数据集后,绑定的相关界面项会自动调整。但是所有相关Widget都换了一遍,如果渲染内容的实例(也就是RenderObject)也都重新变更一遍,那对于界面效果来说,是一个非常严重的打击。

但是实际上,Flutter的渲染效率很高,Widget虽然重建,但是Element以及RenderObject不一定会进行重建,具体的渲染过程,我们可以跟踪源码来看下。

界面创建过程

main方法是主入口,里面只调用了runApp方法。可以看下这个方法的实现:

1
2
3
4
5
void runApp(Widget app) {
WidgetsFlutterBinding.ensureInitialized()
..attachRootWidget(app)
..scheduleWarmUpFrame();
}

注意里面的attachRootWidget方法,这个方法是将我们提供的Widget添加到RootWidget中,具体代码如下:

1
2
3
4
5
6
7
void attachRootWidget(Widget rootWidget) {
_renderViewElement = RenderObjectToWidgetAdapter<RenderBox>(
container: renderView,
debugShortDescription: '[root]',
child: rootWidget
).attachToRenderTree(buildOwner, renderViewElement);
}

这里又调用了attachToRenderTree,这个方法将当前渲染内容加入到渲染树中,看相关代码:

1
2
3
4
5
6
7
8
9
10
11
12
13
14
15
16
RenderObjectToWidgetElement<T> attachToRenderTree(BuildOwner owner, [RenderObjectToWidgetElement<T> element]) {
if (element == null) {
owner.lockState(() {
element = createElement();
assert(element != null);
element.assignOwner(owner);
});
owner.buildScope(element, () {
element.mount(null, null);
});
} else {
element._newWidget = this;
element.markNeedsBuild();
}
return element;
}

初始情况下,RootElement为空,因此创建新的Element。然后通过BuildOwner.buildScope将Element树以及RenderObject树添加子节点。实际上buildScope这个方法不仅在创建界面时用到,刷新界面时同样用到了,后面刷新界面时详细说明一下。

在创建界面时buildScope方法可以简化为:

1
2
3
4
5
6
7
8
9
10
void buildScope(Element context, [VoidCallback callback]) {
···
try {
callback();
} finally {
···
}
}
···
}

由此可以看出,实际上只是执行了传入的callback方法。继续根据传入的方法,只是执行了如下语句:

1
element.mount(null, null);

这个是根节点进行mount操作,因为没有父节点,所以parent传为空,查看相应代码:

1
2
3
4
5
void mount(Element parent, dynamic newSlot) {
assert(parent == null);
super.mount(parent, newSlot);
_rebuild();
}

_rebuild()代码如下:

1
2
3
4
5
6
7
8
9
10
11
12
13
14
15
16
void _rebuild() {
try {
_child = updateChild(_child, widget.child, _rootChildSlot);
assert(_child != null);
} catch (exception, stack) {
final FlutterErrorDetails details = FlutterErrorDetails(
exception: exception,
stack: stack,
library: 'widgets library',
context: 'attaching to the render tree'
);
FlutterError.reportError(details);
final Widget error = ErrorWidget.builder(details);
_child = updateChild(null, error, _rootChildSlot);
}
}

注意,updateChild同样也是界面创建于刷新时的重要处理过程,后面会详细说明,这里只需要认为这里会进行子控件的添加,而且是递归添加处理,分别调用子控件的mount操作。其中widget.child就是我们传入的Widget实例,在Demo中就是MyApp()

查看Element类的mount方法,这里将RenderObject加入到相应的树中。

1
2
3
4
5
6
7
8
9
10
11
12
13
14
15
16
17
18
void mount(Element parent, dynamic newSlot) {
super.mount(parent, newSlot);
_renderObject = widget.createRenderObject(this);
assert(() { _debugUpdateRenderObjectOwner(); return true; }());
assert(_slot == newSlot);
attachRenderObject(newSlot);
_dirty = false;
}

void attachRenderObject(dynamic newSlot) {
assert(_ancestorRenderObjectElement == null);
_slot = newSlot;
_ancestorRenderObjectElement = _findAncestorRenderObjectElement();
_ancestorRenderObjectElement?.insertChildRenderObject(renderObject, newSlot);
final ParentDataElement<RenderObjectWidget> parentDataElement = _findAncestorParentDataElement();
if (parentDataElement != null)
_updateParentData(parentDataElement.widget);
}

之前我们说过,Element与RenderObject不是一一对应的,所以需要寻找到可用的父RenderObject,再添加新的节点。

界面刷新过程

上面的创建过程很好理解,每个Widget都有一个Element,同时也与RenderObject保持关系。但是这样做很麻烦,为什么不直接创建一个渲染节点呢?就像Android那样做?还要维护三者间的关系。

我们之前也写过,Widget是可以随意创建的,但是Element却要尽可能地保持复用,所以刷新时这三者关系还要再好好设计。

界面刷新需要一个切入点(比如Android通过invalidate通知),在Flutter中,就是通过State的setState方法来进行刷新。

查看setState源码,去掉一些无用代码

1
2
3
4
void setState(VoidCallback fn) {
···
_element.markNeedsBuild();
}

很简单,就是调用Element的markNeedsBuild方法,继续查看:

1
2
3
4
5
6
7
void markNeedsBuild() {
···
if (dirty)
return;
_dirty = true;
owner.scheduleBuildFor(this);
}

这里面将Element标记为dirty,然后调用scheduleBuildFor方法,继续查看:

1
2
3
4
5
6
7
8
9
10
11
12
13
14
void scheduleBuildFor(Element element) {
···
if (element._inDirtyList) {
_dirtyElementsNeedsResorting = true;
return;
}
if (!_scheduledFlushDirtyElements && onBuildScheduled != null) {
_scheduledFlushDirtyElements = true;
onBuildScheduled();
}
_dirtyElements.add(element);
element._inDirtyList = true;
···
}

这里将该element加入到_dirtyElements中,标记这个节点刷新时需要进行处理。然后执行了onBuildScheduled方法。这个方法进行了什么操作,继续查找源码:

1
2
3
4
5
6
7
8
9
10
11
12
13
14
15
16
17
18
19
20
21
22
23
24
25
26
27
buildOwner.onBuildScheduled = _handleBuildScheduled;

void _handleBuildScheduled() {
···
ensureVisualUpdate();
}

void ensureVisualUpdate() {
switch (schedulerPhase) {
case SchedulerPhase.idle:
case SchedulerPhase.postFrameCallbacks:
scheduleFrame();
return;
case SchedulerPhase.transientCallbacks:
case SchedulerPhase.midFrameMicrotasks:
case SchedulerPhase.persistentCallbacks:
return;
}
}

void scheduleFrame() {
···
window.scheduleFrame();
_hasScheduledFrame = true;
}

void scheduleFrame() native 'Window_scheduleFrame';

终于找到了,调用了一个native方法 Window_scheduleFrame,这个方法在Flutter Engine中实现。查看注释内容,会回调onBeginFrameonDrawFrame这两个方法。继续查找源码:

1
2
3
window.onBeginFrame = _handleBeginFrame;
window.onDrawFrame = _handleDrawFrame;
···

由于相关代码较多,这里简化一下:

1
2
3
4
5
6
7
8
9
10
11
12
void drawFrame() {
···
try {
if (renderViewElement != null)
buildOwner.buildScope(renderViewElement);
super.drawFrame();
buildOwner.finalizeTree();
} finally {
···
}
···
}

又调用到了buildOwner.buildScope方法!

之前创建界面时采用了这个方法,现在刷新时也用到了,详细说明一下:

1
2
3
4
5
6
7
8
9
10
11
12
13
14
15
16
17
18
19
20
21
22
23
24
25
26
27
28
29
30
31
32
33
34
35
36
37
38
39
40
41
42
43
44
45
46
47
48
49
50
51
52
53
54
55
56
57
58
59
void buildScope(Element context, [VoidCallback callback]) {
if (callback == null && _dirtyElements.isEmpty)
return;
···
Timeline.startSync('Build', arguments: timelineWhitelistArguments);
try {
_scheduledFlushDirtyElements = true;
if (callback != null) {
···
_dirtyElementsNeedsResorting = false;
try {
callback();
} finally {
···
}
}
_dirtyElements.sort(Element._sort);
_dirtyElementsNeedsResorting = false;
int dirtyCount = _dirtyElements.length;
int index = 0;
while (index < dirtyCount) {
···
try {
_dirtyElements[index].rebuild();
} catch (e, stack) {
···
}
index += 1;
if (dirtyCount < _dirtyElements.length || _dirtyElementsNeedsResorting) {
_dirtyElements.sort(Element._sort);
_dirtyElementsNeedsResorting = false;
dirtyCount = _dirtyElements.length;
while (index > 0 && _dirtyElements[index - 1].dirty) {
// It is possible for previously dirty but inactive widgets to move right in the list.
// We therefore have to move the index left in the list to account for this.
// We don't know how many could have moved. However, we do know that the only possible
// change to the list is that nodes that were previously to the left of the index have
// now moved to be to the right of the right-most cleaned node, and we do know that
// all the clean nodes were to the left of the index. So we move the index left
// until just after the right-most clean node.
index -= 1;
}
}
}
···
return true;
}());
} finally {
for (Element element in _dirtyElements) {
assert(element._inDirtyList);
element._inDirtyList = false;
}
_dirtyElements.clear();
_scheduledFlushDirtyElements = false;
_dirtyElementsNeedsResorting = null;
Timeline.finishSync();
···
}
}

代码中可以看到,首先将_dirtyElements进行排序,这是因为节点可能有很多个,如果其中两个节点存在级联关系,父级的Widget build操作必然会调用到子级的Widget build,如果子级又自己build一次,相当于出现了重复操作。因此通过深度排序就会避免这个问题。

排序结束后,对每一个Element进行遍历,执行rebuild操作。需要注意的是,如果在遍历过程中增加了新的节点,那么就需要重新排序。rebuild操作后面详细说明。

所有Element都rebuild后,清空_dirtyElements集合,节点状态恢复正常。

rebuild示意代码如下:

1
2
3
4
5
6
7
8
void rebuild() {
···
if (!_active || !_dirty)
return;
···
performRebuild();
···
}

继续跟踪代码:

1
2
3
4
5
6
7
8
9
10
11
12
13
14
15
16
17
18
19
20
21
22
23
void performRebuild() {
···
Widget built;
try {
built = build();
debugWidgetBuilderValue(widget, built);
} catch (e, stack) {
built = ErrorWidget.builder(_debugReportException('building $this', e, stack));
} finally {
// We delay marking the element as clean until after calling build() so
// that attempts to markNeedsBuild() during build() will be ignored.
_dirty = false;
···
}
try {
_child = updateChild(_child, built, slot);
···
} catch (e, stack) {
built = ErrorWidget.builder(_debugReportException('building $this', e, stack));
_child = updateChild(null, built, slot);
}
···
}

这里的build方法最终调用的是Widget中对应的build方法。updateChild方法同样也是创建界面时调用的方法,继续跟踪源码:

1
2
3
4
5
6
7
8
9
10
11
12
13
14
15
16
17
18
19
20
21
22
23
24
25
Element updateChild(Element child, Widget newWidget, dynamic newSlot) {
···
if (newWidget == null) {
if (child != null)
deactivateChild(child);
return null;
}
if (child != null) {
if (child.widget == newWidget) {
if (child.slot != newSlot)
updateSlotForChild(child, newSlot);
return child;
}
if (Widget.canUpdate(child.widget, newWidget)) {
if (child.slot != newSlot)
updateSlotForChild(child, newSlot);
child.update(newWidget);
···
return child;
}
deactivateChild(child);
···
}
return inflateWidget(newWidget, newSlot);
}

这个方法就是Widget实例变更,但是Element实例不变的核心了,这里分成了四种情况分别处理:

  • 如果不存在新的Widget,那么说明这一个节点应该取消掉了,执行deactivateChild方法。
  • 如果子节点的widget和新的widget一致(这里的一致指的是同一个对象,这个也是允许的),直接返回这个子节点。
  • 如果两个widget不是同一个对象,判断类型是否相同,通过canUpdate方法判断,依据是Widget类型一致,同时Key一致。这种情况下,只需要更新子节点就好了。因此这一步就是widget变更,但是element不变更的原因。
  • 其它情况下则认为子节点是新增的,调用inflateWidget进行子节点创建,里面与创建界面相同,执行了mount操作。

上面的代码都是ComponentElement的类中处理方式,也就是常用的StatelessWidget与StatefulWidget使用的Element。这个过程比较复杂,按照我个人的见解来说,如果想要不进行变更,父级的Widget是不能改变的,否则无法找到锚点,所以界面刷新都是从StatefulWidget开始的,而不能从StatelessWidget开始。刷新开始后,在rebuild中进行递归处理,以StatefulWidget实例为锚点,一级一级地维护Widget与Element的关系。

如果不是ComponentElement,针对RenderObjectElement,则会调用下面的处理:

1
2
3
4
void performRebuild() {
widget.updateRenderObject(this, renderObject);
_dirty = false;
}

每一种RenderObjectElement都会有自己的updateRenderObject处理方式,类似于Android的View操作,针对每一个View来设置属性,这里不再详细说明。

到这里,buildOwner.buildScope(renderViewElement);方法就已经结束了,还记得不,再贴一下drawFrame代码:

1
2
3
4
5
6
7
8
9
10
11
12
void drawFrame() {
···
try {
if (renderViewElement != null)
buildOwner.buildScope(renderViewElement);
super.drawFrame();
buildOwner.finalizeTree();
} finally {
···
}
···
}

剩下执行super.drawFrame();,通过pipelineOwner将RenderObject绘制到界面上,不再详细说说明:

1
2
3
4
5
6
7
8
void drawFrame() {
assert(renderView != null);
pipelineOwner.flushLayout();
pipelineOwner.flushCompositingBits();
pipelineOwner.flushPaint();
renderView.compositeFrame(); // this sends the bits to the GPU
pipelineOwner.flushSemantics(); // this also sends the semantics to the OS.
}

然后再执行buildOwner.finalizeTree();,这里面将一些设置为deactive的Element进行回收,这部分涉及到了生命周期,下面会详细说明。

界面渲染过程

继续上面的内容,前面说了界面构建的过程,创建好了RenderObject树,那么RenderObject tree怎么进行渲染呢?

继续看drawFrame方法:

1
2
3
4
5
6
7
8
void drawFrame() {
assert(renderView != null);
pipelineOwner.flushLayout();
pipelineOwner.flushCompositingBits();
pipelineOwner.flushPaint();
renderView.compositeFrame(); // this sends the bits to the GPU
pipelineOwner.flushSemantics(); // this also sends the semantics to the OS.
}

pipelineOwner.flushLayout()对需要relayout的RenderObject对象重新测量。

1
2
3
4
5
6
7
8
9
10
11
12
13
14
15
16
17
18
19
20
21
22
void flushLayout() {
profile(() {
Timeline.startSync('Layout', arguments: timelineWhitelistArguments);
});
···
try {
// TODO(ianh): assert that we're not allowing previously dirty nodes to redirty themselves
while (_nodesNeedingLayout.isNotEmpty) {
final List<RenderObject> dirtyNodes = _nodesNeedingLayout;
_nodesNeedingLayout = <RenderObject>[];
for (RenderObject node in dirtyNodes..sort((RenderObject a, RenderObject b) => a.depth - b.depth)) {
if (node._needsLayout && node.owner == this)
node._layoutWithoutResize();
}
}
} finally {
···
profile(() {
Timeline.finishSync();
});
}
}

先将_nodesNeedingLayout集合根据节点深度进行排序,然后重新进行layout。_nodesNeedingLayout集合的内容在每个RenderObject更新时会进行标记的,比如RichText:

1
2
3
4
5
6
7
8
9
10
11
12
13
14
15
16
17
18
set text(TextSpan value) {
···
switch (_textPainter.text.compareTo(value)) {
···
case RenderComparison.layout:
_textPainter.text = value;
_overflowShader = null;
markNeedsLayout();
break;
}
}

void markNeedsLayout() {
···
owner._nodesNeedingLayout.add(this);
owner.requestVisualUpdate();
···
}

查看源码,_layoutWithoutResize方法基本上就是调用performLayout方法,这个方法在每个RenderObject中的实现都不一样,不过约定是进行布局展示后,调用child.layout方法,继续查看这个方法:

1
2
3
4
5
6
7
8
9
10
11
12
13
14
15
16
17
18
19
20
21
22
23
24
25
26
27
28
29
30
31
32
33
34
35
36
37
38
39
40
void layout(Constraints constraints, { bool parentUsesSize = false }) {
···
RenderObject relayoutBoundary;
if (!parentUsesSize || sizedByParent || constraints.isTight || parent is! RenderObject) {
relayoutBoundary = this;
} else {
final RenderObject parent = this.parent;
relayoutBoundary = parent._relayoutBoundary;
}
···
if (!_needsLayout && constraints == _constraints && relayoutBoundary == _relayoutBoundary) {
···
return;
}
_constraints = constraints;
_relayoutBoundary = relayoutBoundary;
···
if (sizedByParent) {
···
try {
performResize();
assert(() { debugAssertDoesMeetConstraints(); return true; }());
} catch (e, stack) {
_debugReportException('performResize', e, stack);
}
···
}
RenderObject debugPreviousActiveLayout;
···
try {
performLayout();
markNeedsSemanticsUpdate();
assert(() { debugAssertDoesMeetConstraints(); return true; }());
} catch (e, stack) {
_debugReportException('performLayout', e, stack);
}
···
_needsLayout = false;
markNeedsPaint();
}

上面这段代码可以分析出很多东西:

!parentUsesSize || sizedByParent || constraints.isTight || parent is! RenderObject 这四种判断条件设置relayoutBoundary为RenderObject本身,这有什么用?用处可大了。

约束条件是沿着树的深度,从上到下的,但是layout布局是从下到上的,这个很好理解。大部分情况下,父控件的大小除了约束条件外,还依赖于子控件的大小,所以要从下向上分别layout,当然paint正好相反,是从上到下的顺序,这个后面说明。relayoutBoundary指的是布局边界,也就是说,这个renderObject的大小是固定的,不会因为其子节点的大小而变化,这种情况下就可以认为这个RenderObject就是一个锚点,它的子节点有变动,不会影响到父节点的layout。

那上面这四种情况分别是什么呢?首先还是需要先说明下约束条件

约束条件

为了简单说明,这里只说下BoxConstraints,也就是边界约束,而更为复杂的SliverConstraints其它文章中再详细说明。

先看下BoxConstraints的构造方法,里面就已经包括了所有属性:

1
2
3
4
5
6
const BoxConstraints({
this.minWidth = 0.0,
this.maxWidth = double.infinity,
this.minHeight = 0.0,
this.maxHeight = double.infinity
});

这个很好理解,看字面意思就能明白,分别约束了最大/最小宽度、最大/最小高度,也就是要求渲染后的视图一定要在这个范围内展示。而上面的构造方法则展示了最为宽松的约束条件:最小高度或宽度为0,最大高度或宽度为无穷大。

在实际使用时,一般会将父节点的约束条件传递给子节点,如果子节点有额外的约束条件,则进行比对添加,然后再传给下一级。

约束条件很简单,但是根据这四种条件,会有几种类型:

  • tight 如果最小约束(minWidth,minHeight)和最大约束(maxWidth,maxHeight)是一样的,那么就限定死了这个节点的宽度与高度。
  • loose 如果最小约束都是0.0
  • bounded 如果最大约束都不是double.infinity
  • unbounded 如果最大约束都是double.infinity
  • expanding 如果最小约束和最大约束都是infinite

明确约束的概念后,我们继续分析渲染过程。

继续渲染过程分析

之前说到了四种情况,下面分别进行说明:

  • !parentUsesSize parentUsesSize表示父节点是否要依赖子节点的size,如果该值为false,子节点要重新布局的时候并不需要通知父节点
  • sizedByParent sizedByParent表示当前的节点虽然不是isTight,但是通过其他约束属性,也可以明确的知道size,比如Expanded,并不一定需要明确的size
  • constraints.isTight 这个上面已经说明了
  • parent is! RenderObject 这个更明确了,父节点都不能进行渲染,自然不能进行size操作

非四种情况下,则调用performResizeperformLayout遍历所有子节点,直到layout完成。

按照之drawFrame处理,flushLayout完成后进行flushCompositingBits,这个方法是用来为每个RenderObject设置适当needCompositing值,最终needCompositing将会决定生成多少layer提交给引擎,引擎中叠加绘制每一层layer(skia等经典用法,mix也是类似实现)。查看下面代码:

1
2
3
4
5
6
7
8
9
10
11
12
13
14
15
16
17
18
19
20
21
22
23
24
25
26
27
void flushCompositingBits() {
profile(() { Timeline.startSync('Compositing bits'); });
_nodesNeedingCompositingBitsUpdate.sort((RenderObject a, RenderObject b) => a.depth - b.depth);
for (RenderObject node in _nodesNeedingCompositingBitsUpdate) {
if (node._needsCompositingBitsUpdate && node.owner == this)
node._updateCompositingBits();
}
_nodesNeedingCompositingBitsUpdate.clear();
profile(() { Timeline.finishSync(); });
}

void _updateCompositingBits() {
if (!_needsCompositingBitsUpdate)
return;
final bool oldNeedsCompositing = _needsCompositing;
_needsCompositing = false;
visitChildren((RenderObject child) {
child._updateCompositingBits();
if (child.needsCompositing)
_needsCompositing = true;
});
if (isRepaintBoundary || alwaysNeedsCompositing)
_needsCompositing = true;
if (oldNeedsCompositing != _needsCompositing)
markNeedsPaint();
_needsCompositingBitsUpdate = false;
}

每一个layer内容会同步变更,可以将一些paint较为复杂的节点单独设置一个layer,或者经常变动的paint设置为单独layer,这样可以减少多次paint导致的性能耗损。

继续查看flushPaint相关代码:

1
2
3
4
5
6
7
8
9
10
11
12
13
14
15
16
17
18
19
20
21
22
23
void flushPaint() {
profile(() { Timeline.startSync('Paint', arguments: timelineWhitelistArguments); });
···
try {
final List<RenderObject> dirtyNodes = _nodesNeedingPaint;
_nodesNeedingPaint = <RenderObject>[];
// Sort the dirty nodes in reverse order (deepest first).
for (RenderObject node in dirtyNodes..sort((RenderObject a, RenderObject b) => b.depth - a.depth)) {
assert(node._layer != null);
if (node._needsPaint && node.owner == this) {
if (node._layer.attached) {
PaintingContext.repaintCompositedChild(node);
} else {
node._skippedPaintingOnLayer();
}
}
}
···
} finally {
···
profile(() { Timeline.finishSync(); });
}
}

基本格式与前面一样,注意PaintingContext.repaintCompositedChild这个方法:

1
2
3
4
5
6
7
8
9
10
11
12
13
14
15
16
17
18
19
20
21
22
23
24
25
26
27
28
29
30
31
32
33
static void _repaintCompositedChild(
RenderObject child, {
bool debugAlsoPaintedParent = false,
PaintingContext childContext,
}) {
···
if (child._layer == null) {
···
child._layer = OffsetLayer();
} else {
···
child._layer.removeAllChildren();
}
···
childContext ??= PaintingContext(child._layer, child.paintBounds);
child._paintWithContext(childContext, Offset.zero);
childContext.stopRecordingIfNeeded();
}

void _paintWithContext(PaintingContext context, Offset offset) {
···
if (_needsLayout)
return;
···
RenderObject debugLastActivePaint;
···
_needsPaint = false;
try {
paint(context, offset);
···
}
···
}

isRepaintBoundary为true的RenderObject会创建一个自己的layer,最终调用了RenderObject.paint方法。

Flutter会把所有的layer都加入到ui.SceneBuilder对象中。然后在renderView.compositeFrame()中 ui.SceneBuilder会构建出ui.Scene(场景),交给ui.window.render方法去做最后真实渲染,最终绘制过程在Flutter引擎中实现并展示。

1
2
3
4
5
6
7
8
9
10
11
12
13
14
void compositeFrame() {
Timeline.startSync('Compositing', arguments: timelineWhitelistArguments);
try {
final ui.SceneBuilder builder = ui.SceneBuilder();
final ui.Scene scene = layer.buildScene(builder);
if (automaticSystemUiAdjustment)
_updateSystemChrome();
_window.render(scene);
scene.dispose();
···
} finally {
Timeline.finishSync();
}
}

到现在为止,界面构建过程与渲染过程都已经说明完,那我们跟踪源码的目的是什么呢?至少我们可以做到下面三点:

  • 可以对源码进行修改。目前的代码还不是很完善,对于一些特殊的要求,我们可以通过源码修改的方式来完成,而且根据实践,在Android Studio中修改后的源码可以直接参与编译,不需要任何过程。
  • 了解渲染过程,同时也了解了Widget、Element、RenderObject的处理方式以及生命周期,可以自己实现自定义的控件效果。
  • 了解整个渲染过程,出现问题后能够知道瓶颈在哪里,同时增加绘制效率,防止卡顿发生。

性能优化

上面主要分析的是ComponentWidget以及相关Element,那就先从这里的优化方向说起。

之前我写过,绘制的锚点在于StatefulWidget,这个Widget的实例是不变的,而State的build方法,会创建出大量新的widget。这些widget对象创建本身就有开销,再加上element的对比判断等等,所以在这方面,我们可以尽可能地提高效率。

  • StatelessWidget本身是不可变的,我们使用的StatefulWidget类都应该先判断是否值得,如果可以的话,应该使用StatelessWidget进行替代。比如每个界面的框架类,如果是不变的,就应该使用StatelessWidget,只有需要变更项才会使用StatefulWidget。

  • 更新的StatefulWidget设计时尽可能地独立开来,非耦合功能拆分展示。

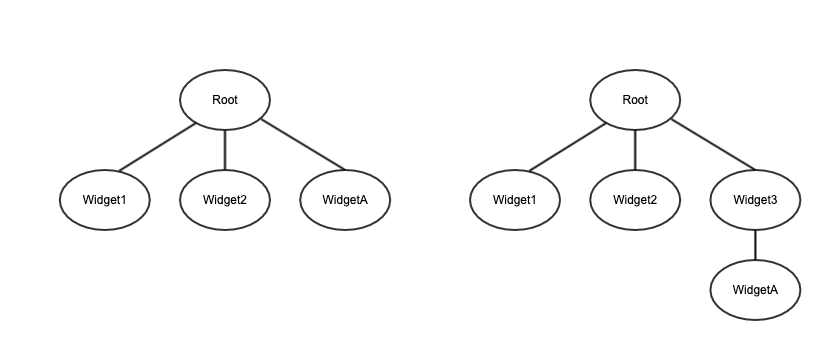
  • 因为每次StatefulWidget的变更都会影响到其下的所有子节点,如果只是有限的几个控件变更,可以将这几个控件单独封装为一个StatefulWidget,单独刷新这个Widget,避免其他控件更新影响效率。这个算是最小封装原则,如下图所示,WidgetA这个控件需要更新,则将其单独封装一个StatefulWidget:

  • Widget的构造方法以及build方法会经常调用,避免在其中执行太多操作,可以转移的操作放在其它地方执行

  • 可以尝试将部分Widget实例保持不变,比如增加const修饰,或者StreamBuilder方式指定对象等等,但是这样操作需要当心,有可能会引入问题。

  • 如果是自定义控件,采用CustomMultiChildLayout等方式自定义布局展示,可以考虑下使用relayoutBoundary方式,减少节点布局设置

  • 绘制时,一些可能会占用较多资源的控件build操作,可以加到RepaintBoundry控件中,比如静态图片,比较复杂的图片设置为一个单独的layer,避免重复build,在GPU中也会存在缓存,减少开销。

  • 不可见的控件,尽量不进行build操作

  • 自定义控件,避免在绘制时进行创建对象操作,尽可能复用配置,这个和Android是一样的。

  • 尽量减少saveLayer操作,如果是透明效果或者裁剪效果,尽量设置到子控件上。

除了与界面渲染相关的优化建议,实际上还有一切其它的性能优化项,比如:

  • 部分内容考虑延迟加载
  • 较为耗时的计算操作放置到新的isolate中执行(isolate、Runner与event loop中异步处理的会单独说明,这些还是有很大区别的)
  • 内存加载以及内存泄漏等进行优化

Flutter生命周期

State生命周期

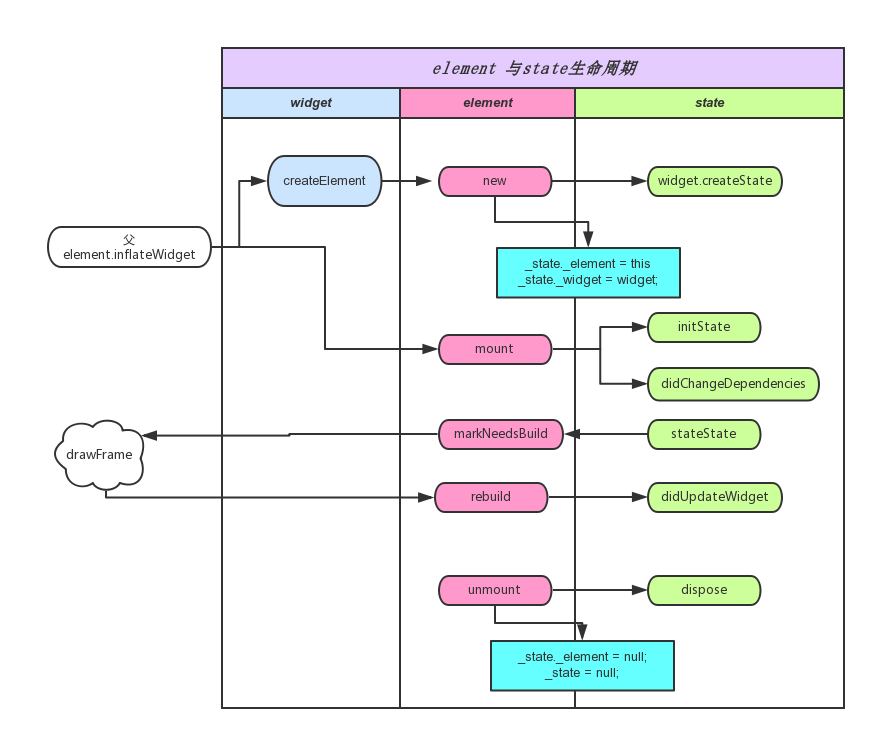
现在使用最多的就是StatefulWidget,先说下State的生命周期。查看State的方法,有这几个需要关注的(按照源码中查找的顺序):initState、didUpdateWidget、reassemble、setState、deactivate、dispose、build、didChangeDependencies。

其中reassemble是为了开发调试使用的,hot reload时调用该方法,Release版本下该方法不会被调用到,因此通常情况下无需重载该方法。setState与build方法之前已经说明过,不需要再次说明。

其余的几种方法的生命周期如下图:

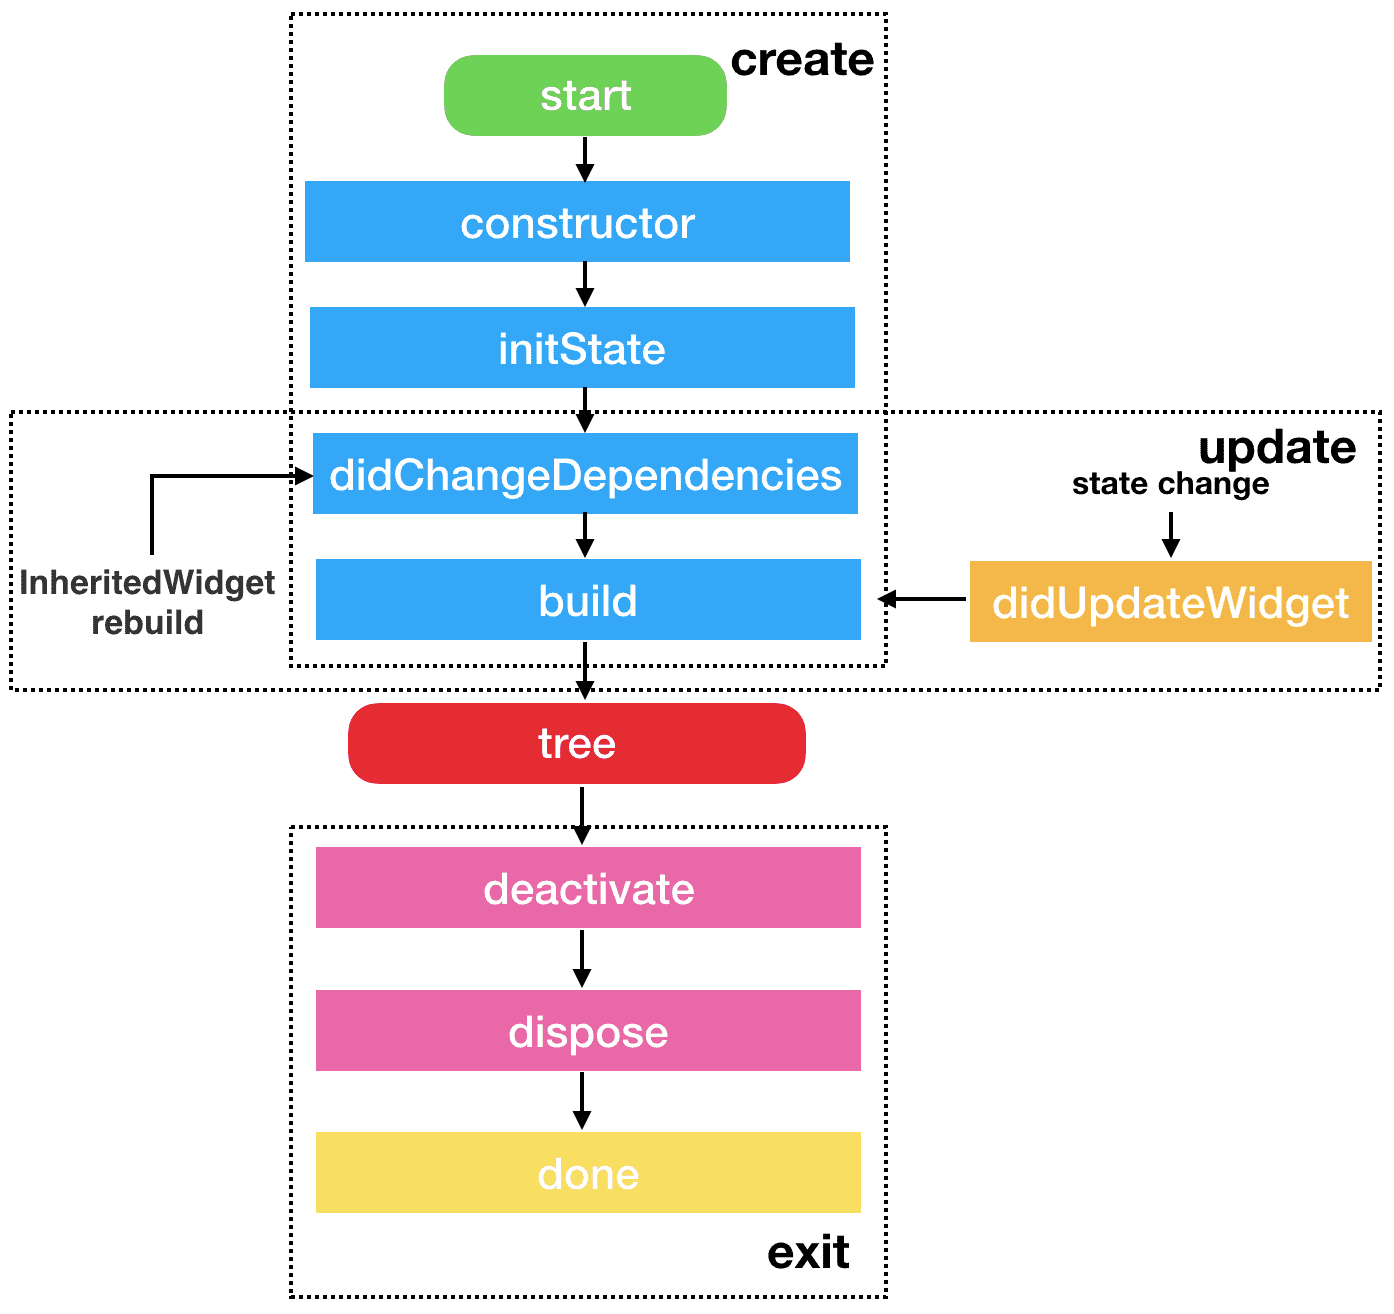
这张图是网上找的,内容比较全面,不过关于deactivate部分还需要再调整下,下面具体来说每一个方法:

  • 构造方法不用详细说明,创建State实例后才会执行各种操作。

  • initState 这个方法只在 void _firstBuild()中调用到,而_firstBuild方法只会在Element的mount方法中调用到,因此initState只会在这个控件第一次创建时才会触发。

  • didChangeDependencies 这个方法有很多触发地方,首次同样也是在_firstBuild方法中,在initState方法执行后触发。除此以外,还会在notifyDependent方法中触发,而notifyDependent方法在void notifyClients(InheritedWidget oldWidget)方法中调用到,最后的方法是InheritedWidget参数变更时的触发方法(InheritedWidget的具体原理以及常用方式在以后会详细说明)。
    所以总结一下,didChangeDependencies有两种执行时机:1、会在initState之后执行;2、会在依赖的InheritedWidget发生变化的时执行

  • didUpdateWidget 这个方法会在StatefulElement.update(StatefulWidget newWidget)中执行,而后面一个方法我们很熟悉了,就是之前判断Widget变更的四种条件之一了,再看下源码:

1
2
3
4
5
6
if (Widget.canUpdate(child.widget, newWidget)) {
if (child.slot != newSlot)
updateSlotForChild(child, newSlot);
child.update(newWidget);
return child;
}

所以didUpdateWidget的执行时机在于Widget实例变更了,但是Element实例没有变更的情况,也就是runtimeType与Key一致的情况。

  • deactivate 调用时机同样在widget变更的四种条件之一,节点树构建时,发现某个节点不存在了,将其设置状态为deactvate。实际上deactivate调用后并不一定会直接调用dispose方法,framework在某些情况下会将remove掉的子树重新设置到其他位置,这时候会调用deactivate以及build方法,但不会调用dispose方法。例如路由设置,A界面跳转到B界面,这时A界面就会触发deactivate以及build方法。同样的如果从B界面返回到A界面,framework需要重新将子树放回放回原来的位置,同样会触发A界面的deactivate以及build方法。

  • dispose 这个方法就很明确了,当Element销毁时调用该方法,调用时机在unmount中。

App生命周期

App生命周期监听可以通过WidgetsBindingObserver类进行设置,里面存在一个void didChangeAppLifecycleState(AppLifecycleState state)方法,实际使用时可以通过mixin方式进行监听。例如:

1
2
3
4
5
6
7
8
9
10
11
12
13
14
15
16
17
18
19
20
21
22
23
24
25
26
27
class _MyHomePageState extends State<MyHomePage> with WidgetsBindingObserver {

@override
void didChangeAppLifecycleState(AppLifecycleState state) {
switch(state) {
case AppLifecycleState.inactive:
print('inactive state.');
break;
case AppLifecycleState.resumed:
print('resumed state.');
break;
case AppLifecycleState.paused:
print('paused state.');
break;
case AppLifecycleState.suspending:
print('suspending state.');
break;
default:
print('unknown state.');
}
}

@override
Widget build(BuildContext context) {
return Container();
}
}

这四种状态分别进行说明:

  • resumed 与Android类似,表示界面可见,可响应事件
  • inactive 表示无法获取焦点,无法响应用户事件,但是会有drawFrame回调,比如弹出dialog情况
  • paused 应用挂起,这种情况下drawFrame回调也不会有,比如退到后台
  • suspending ios中没有该状态,pause之后的状态,应用停止。该状态不常用

常见的状态切换:

应用退到后台:inactive -> paused

应用后台转到前台: inactive -> resumed

Widget、Element 与 RenderObject生命周期

之前的源码分析中已经做了详细的说明,有空的时候画一张图补上吧,下面是找的一张网上图片: